

Table of Contents
- What Is Zellige Tile and Why It Works in Kitchens
- 1. Create a Statement Backsplash with Zellige Tile Backsplash Ideas
- 2. Line Kitchen Islands and Peninsulas with Zellige Tile
- 3. Design Feature Niches and Open Shelving Accents
- 4. Install Zellige Tile on Kitchen Flooring
- How to Install Zellige Tile: Substrate and Layout Preparation
- 5. Blend Tones and Mix Zellige Patterns for Visual Interest
- Zellige Tile Grout Color Guide: Choosing the Right Finish
- 6. Pair Zellige with Coordinating Materials and Fixtures
- 7. Seal and Maintain Zellige Tile in High-Moisture Kitchen Areas
- Frequently Asked Questions
Last Updated: September 28, 2026
What Is Zellige Tile and Why It Works in Kitchens
Zellige tile is handcrafted mosaic tilework that originates from centuries-old Moroccan tradition, where master artisans in Fez hand-chisel each piece from organic clay. At Justmorocco, we recognize that 7 ways to incorporate zellige tile in kitchen design represent a gateway to authentic, luxurious spaces that blend cultural heritage with modern functionality. These tiles are kiln-fired to create distinctive glazed surfaces with natural irregularities, tonal depth, and light-reflecting properties that mass-produced alternatives cannot replicate.
What makes zellige tile exceptional for kitchens is its durability combined with visual richness. The handcrafted nature means no two tiles are identical, each one carries subtle variations in color, glaze, and texture. This imperfection is the aesthetic strength. Unlike subway tile or standard ceramics, zellige creates genuine visual interest through geometric patterns, often featuring herringbone layouts or parquet-style arrangements that draw the eye upward and anchor the space with authenticity.
1. Create a Statement Backsplash with Zellige Tile Backsplash Ideas
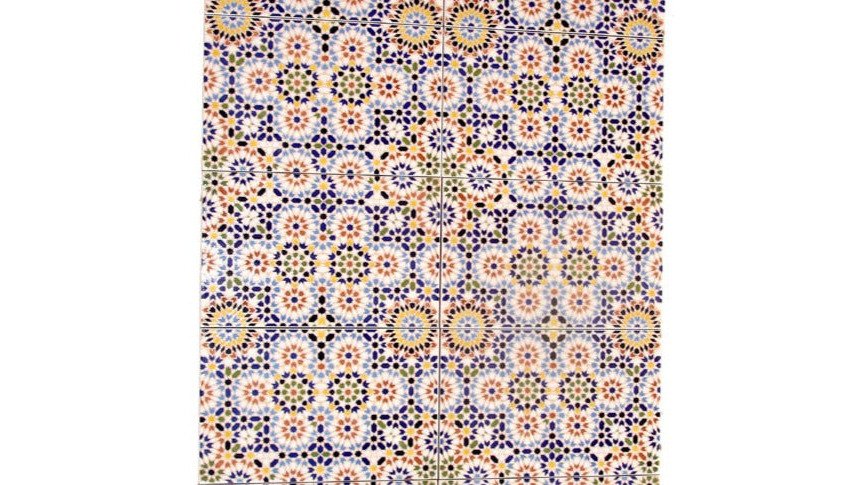
A zellige tile backsplash transforms the kitchen's most visible surface into a focal point that commands attention. The geometric patterns, typically complex, abstract designs radiating from central stars, create rhythm and movement behind your cooktop or sink. This approach works best when the backsplash becomes the room's primary design anchor, allowing cabinetry and countertops to remain more neutral.
Choosing Your Pattern and Layout
The pattern you select determines whether your backsplash reads as bold or balanced. Moroccan zellige tile backsplash ideas typically fall into three categories: geometric star patterns (12-point or 8-point), diamond lattices, and abstract interlocking designs. Each carries different visual weight.
Star patterns demand attention and work best in kitchens with simpler cabinetry. Diamond patterns bridge traditional and contemporary aesthetics. Abstract interlocking designs suit eclectic spaces where multiple design elements already compete for focus. When incorporating zellige tile in kitchen backsplashes, consider the rest of your palette first. If your cabinetry features high-relief carved panels or dark wood finishes, choose zellige patterns in off-white and terracotta tones to avoid visual overload. If cabinetry is minimal, darker burgundy and cream combinations create sophisticated depth.
Layout matters as much as pattern. Herringbone arrangements add diagonal energy. Straight grid layouts feel more formal. Staggered or offset patterns create subtle movement without chaos. Most installers recommend pulling tiles from multiple cartons during installation to ensure maximum uniformity of shade throughout the backsplash area, which accounts for the natural color variation inherent in handcrafted pieces.
Pairing with Cabinetry and Countertops
Zellige tile backsplash design succeeds when it complements rather than competes with surrounding surfaces. Dark walnut or espresso cabinetry pairs beautifully with zellige featuring warm terracotta, ochre, and sand tones. The contrast between deep wood and lighter tile creates visual balance. White Carrara marble or pale granite countertops brighten the space and prevent the backsplash from feeling too heavy.
Avoid pairing highly patterned zellige with ornately carved cabinetry unless the patterns share a similar color palette. The eye needs a visual resting place. Neutral wall paint, soft cream or parchment, allows the backsplash to command focus without competition. When designing your kitchen, consider how natural and artificial light will interact with the glazed zellige surface. The light reflection properties of handcrafted tiles create shadow patterns and tonal shifts throughout the day, adding a layer of movement that flat, industrially-produced tiles cannot achieve.
2. Line Kitchen Islands and Peninsulas with Zellige Tile
Kitchen islands and peninsulas benefit from zellige tile accents that define the space without overwhelming it. Rather than tiling the entire island, consider a zellige tile border or lower-third treatment. This approach grounds the island visually while keeping the work surface practical and uncluttered.
A common approach is to install zellige tile on the island's exterior sides, creating a visual frame that draws guests' eyes to the workspace. Peninsulas work similarly, tile the side facing the dining or living area, leaving the kitchen-facing side open for functionality. This positioning showcases the geometric patterns and tonal depth while keeping the island's primary work surface accessible for prep and plating.
Zellige tile on islands and peninsulas works best with neutral countertops like white marble, pale granite, or light wood. The tile becomes the design statement; surfaces should support rather than compete. Spacing becomes critical here. Use a minimum of 1/8-inch grout joints when installing these tiles, as the handcrafted nature of zellige means slight size variations that wider joints accommodate gracefully.
3. Design Feature Niches and Open Shelving Accents
Open shelving and architectural niches are underutilized opportunities for zellige tile integration. A niche framed in zellige becomes a display alcove for pottery, glassware, or decorative objects. The tile creates a backdrop that elevates whatever sits within it, suddenly a simple ceramic bowl becomes part of the kitchen's design narrative.
Feature niches work best at eye level, typically 36-48 inches from the floor. Install zellige tile on the back wall and sides of the niche, leaving the opening frame in wood or stone. The geometric patterns draw focus inward, creating depth perception and visual interest in what might otherwise be wasted wall space.
Open shelving accents benefit from zellige tile backing as well. Rather than floating shelves on plain drywall, mount them against a zellige-tiled accent wall. The tile provides visual anchor and prevents the shelves from appearing to float aimlessly. This works particularly well in kitchens with Moorish arches or scalloped archways framing the shelving area, the traditional architectural elements and handcrafted tile reinforce each other's authenticity.
4. Install Zellige Tile on Kitchen Flooring
Zellige tile flooring demands careful consideration. Kitchen floors experience moisture, foot traffic, and thermal stress. Zellige can handle it, but only with proper substrate preparation and sealing.
Flooring applications typically use muted earth tones, sage, ochre, sand, and terracotta. These colors hide dirt and grease better than lighter shades while maintaining the warm, authentic aesthetic zellige provides. Hexagonal or geometric patterns work well for flooring because they create visual continuity without the busy feeling that smaller tiles can produce.
The real challenge with zellige tile kitchen flooring is the installation itself. These tiles are thicker and heavier than standard options, requiring reinforced substrate and proper thin-set mortar application. The payoff is a floor that tells a story, no two tiles look identical, creating an heirloom quality that mass-produced flooring cannot match. Many homeowners reserve zellige flooring for entryways or select areas rather than the entire kitchen, using it as a design anchor that transitions to more practical surfaces in high-traffic zones.
How to Install Zellige Tile: Substrate and Layout Preparation
Installing zellige tile successfully requires understanding the specific demands of handcrafted, porous materials. This is not a DIY project for beginners. The techniques differ significantly from standard tile installation because zellige tiles vary slightly in size, thickness, and weight.
Substrate Preparation for Heavy Handcrafted Tiles
Your substrate must be rock-solid. Zellige tiles are heavier than standard ceramic or porcelain, and their handcrafted nature means uneven stress distribution across the surface. A substrate that flexes or settles will crack the tiles or cause grout joints to fail.
For backsplashes, use cement board or fiber-reinforced board over standard drywall. Screw it down every 8-12 inches. For floors, you need a structurally sound subfloor with minimal deflection. If your existing floor has any give, reinforce it with additional joists or support beams before tiling. Uneven substrates are the leading cause of zellige tile installation failure.
Apply a waterproofing membrane before setting any tiles. This is non-negotiable in kitchens where moisture exposure is constant. The porosity of zellige means water can penetrate if you skip this step. Use a liquid-applied waterproof membrane or sheet membrane, depending on your installer's preference and local best practices.
Spacing and Grout Joint Guidelines
Spacing zellige tile requires a different mindset than spacing uniform, factory-made tiles. Use a minimum of 1/8-inch grout joints, many installers recommend 3/16-inch or 1/4-inch to accommodate the natural variation in tile size. This wider spacing is not a weakness; it's a design choice that acknowledges and celebrates the handcrafted nature of zellige.
Sanded grout works best with grout joints 1/8-inch or larger. Unsanded grout can shrink and crack in wider joints. When laying out your pattern, pull tiles from several different cartons to ensure maximum uniformity of shade throughout the installation area. This prevents accidental clustering of lighter or darker tiles, which can create unintended visual patterns.
Use thin-set mortar specifically formulated for handcrafted or natural stone tiles. Standard thin-set may not provide adequate support for zellige's weight and irregular surface. Your installer should comb the mortar at a 45-degree angle to ensure full coverage behind each tile.
5. Blend Tones and Mix Zellige Patterns for Visual Interest
The most sophisticated zellige tile kitchens blend multiple tones and patterns strategically. This is where zellige truly distinguishes itself from mass-produced alternatives. No two tiles are identical, so you can create intentional color gradations and tonal depth that feel organic rather than manufactured.
A common approach is to use a primary pattern in one area, say, the backsplash, and introduce a secondary pattern or solid tone as an accent. For example, a burgundy and cream diamond-pattern backsplash can be framed with a border of solid terracotta tiles. The eye reads this as intentional design rather than inconsistency.
Tonal blending works best when colors share similar saturation and warmth. Pairing deep burgundy with light cream creates dramatic contrast. Mixing ochre, sand, and sage creates subtle, sophisticated depth. Avoid jumping between warm and cool tones unless that contrast is your deliberate design goal.
Light reflection plays a crucial role in how blended tones appear throughout the day. Morning light hits zellige tile differently than afternoon sun. The glazed surface catches and diffuses light, creating shadow patterns that shift as the sun moves. This dynamic quality means your kitchen's visual appearance changes subtly over time, a feature that reinforces the handcrafted, living quality of zellige.
Zellige Tile Grout Color Guide: Choosing the Right Finish
Grout color dramatically impacts how zellige tile patterns read in your space. This single choice can make a pattern recede into the background or leap forward as a focal point. The decision is more important than many homeowners realize.
Matching grout, where grout color mirrors the dominant tile tone, creates visual continuity and makes patterns read as cohesive. A burgundy and cream zellige backsplash with burgundy grout emphasizes the darker tones and creates a more formal, grounded appearance. Cream grout in the same backsplash emphasizes the lighter tones and feels airier.
Contrasting grout, where grout color differs from both tile tones, emphasizes the geometric pattern itself. Using charcoal or dark gray grout with light zellige tile makes the pattern jump forward dramatically. This approach works best when the pattern is your design priority. Using light grout with dark tile creates a softer contrast that still defines the geometry without overwhelming the space.
Grout Width and Its Impact on Light Reflection
Grout width determines how much light the grout lines themselves reflect. Narrow grout joints (1/8-inch) disappear visually, allowing the tile pattern to dominate. Wider joints (1/4-inch or more) become visible design elements, particularly when grout color contrasts with tile tones.
The handcrafted irregularities in zellige tile become more pronounced with wider grout joints. Rather than hiding these natural variations, wider spacing celebrates them. The grout lines create a visual grid that organizes the tiles' subtle color shifts and size variations into a cohesive composition.
Consider how light will interact with grout lines throughout the day. Morning light grazing across a backsplash at a low angle emphasizes grout lines and creates shadow depth. This effect is dramatic with wider joints and lighter grout colors. If you want maximum visual impact from your zellige tile, wider grout joints and contrasting grout color will deliver it.
6. Pair Zellige with Coordinating Materials and Fixtures
Zellige tile kitchens succeed when supporting materials amplify rather than compete with the tile's aesthetic. Brass, copper, and hammered metal fixtures complement zellige beautifully. These materials share the handcrafted, artisanal quality that zellige embodies. Perforated brass pendant lights create shadow art on walls when lit, adding another layer of visual texture and movement.
Wood cabinetry in dark walnut, espresso, or matte oak provides grounding contrast. The texture of carved wooden panels or high-relief geometric designs on cabinet doors echoes the complexity of zellige patterns without duplicating them. Pale stone countertops, white Carrara marble or light granite, brighten the space and prevent visual heaviness.
Avoid pairing zellige with ultra-modern, minimalist fixtures or finishes. Polished chrome, stainless steel, and sleek glass create visual tension with handcrafted tile. If your kitchen leans contemporary, choose fixtures with subtle traditional details, brushed brass instead of polished chrome, warm copper instead of cold steel.
The goal is visual cohesion. Every material should feel intentional and supportive of the overall aesthetic. Zellige tile is a statement; surrounding materials should enhance that statement rather than introduce competing narratives.
7. Seal and Maintain Zellige Tile in High-Moisture Kitchen Areas
Zellige tile is naturally sealed and protected, but grout joints require sealing in kitchens where moisture exposure is constant.
Sealing Requirements for Kitchen Environments
Grout joints should be sealed according to manufacturers' recommendations, typically within 72 hours of installation. Use a penetrating grout sealer designed for natural stone or handcrafted tiles. This sealer fills the porous grout material and prevents water absorption. Reapply every 1-3 years, depending on kitchen use and humidity levels.
For zellige tiles themselves, sealing is typically unnecessary, the glaze provides protection. However, if your zellige tiles have unglazed edges or if you've chosen a matte glaze finish, consult your installer about whether additional sealing is needed. Matte finishes are more porous than glossy glazes and may benefit from a clear penetrating sealer.
Kitchen environments present unique challenges. Steam from cooking, splashes from cleaning, and humidity fluctuations all stress grout and tile. Ensure your backsplash or floor has adequate ventilation. Use an exhaust fan during and after cooking. Wipe up standing water promptly rather than allowing it to evaporate, which can deposit mineral deposits and accelerate grout deterioration.
Cleaning and Long-Term Care
Sweep zellige floors regularly and use a mild soap cleaner for routine maintenance. Avoid acidic cleaners like vinegar or lemon juice, which can etch the glaze over time. Never use abrasive scrubbers or scouring powders, these damage the handcrafted glaze finish.
Keeping your tile clean of dirt and other abrasive particles extends the vibrancy and beauty of your floor for many years. For backsplashes, wipe with a damp cloth after cooking to prevent grease buildup. Allow the tile to air dry rather than buffing it, which can leave streaks on the glazed surface.
If grout becomes stained or discolored, professional cleaning services can restore it without damaging the tile. DIY grout cleaning often causes more problems than it solves. The handcrafted nature of zellige tile means you're working with a premium material that deserves professional care when deep cleaning is needed.
Zellige tile brings authenticity and visual richness to kitchens that mass-produced alternatives cannot match. Each handcrafted piece carries centuries of artisanal tradition, creating spaces that feel both timeless and deeply personal. At Justmorocco, we specialize in sourcing authentic zellige tile and guiding homeowners through custom kitchen installations that honor the material's heritage while meeting modern functionality demands. Our custom furniture imports service ensures that your zellige tile installation is paired with complementary Moroccan pieces that amplify the aesthetic cohesion of your space.
Frequently Asked Questions
What materials pair best with zellige tile in a kitchen?
Zellige tile pairs beautifully with natural wood cabinetry, marble or stone countertops, and brass or copper fixtures. The handcrafted irregularity and tonal depth of zellige work best with materials that have their own texture and warmth. Avoid high-gloss finishes that compete with the tile's visual interest. Dark walnut or espresso-stained wood creates a sophisticated contrast, while lighter wood tones offer a more subtle, cohesive look. Copper sinks and brass pendant lights complement the geometric patterns and enhance light reflection across the tile surface.
How do you properly install zellige tiles to account for their natural variation?
Zellige tiles are handmade, so each piece has slight irregularities in thickness, size, and glaze. Pull tiles from multiple cartons during installation to distribute color and tonal variation evenly across the surface. Use thin-set mortar and maintain consistent spacing with a minimum 1/8-inch grout joint. Because zellige tiles are hand-chiseled and kiln-fired, the substrate must be properly prepared and level to prevent rocking or lippage. Work with a professional installer experienced in handcrafted tile if you're unfamiliar with managing the natural imperfections that give zellige its authentic character.
What are the best grout color options for zellige kitchen backsplashes?
Grout color dramatically affects how zellige tile reads in your kitchen. Neutral grout colors, cream, light gray, or taupe, allow the tile's geometric patterns and tonal depth to dominate. Dark grout (charcoal or espresso) emphasizes the individual tiles and creates stronger visual contrast, which works well in modern or eclectic designs. For a seamless, cohesive look, match grout to the lighter tones in your zellige palette. Use sanded grout for joints 1/8-inch or larger, and seal grout joints according to manufacturer recommendations to protect against staining in this high-use kitchen area.
Are zellige tiles considered a passing trend or a classic design choice?
Zellige tile has been used in Moroccan architecture for centuries, making it a timeless design element rather than a fleeting trend. The handcrafted nature, geometric patterns, and cultural authenticity give zellige enduring appeal. While its popularity in contemporary kitchens has grown, the material itself represents a classic tradition rooted in Islamic and Moroccan art. Homeowners investing in zellige tile are choosing a design that transcends seasonal trends and maintains aesthetic and resale value because of its authentic craftsmanship and timeless geometric language.
How do you clean and maintain zellige tile in high-traffic kitchen areas?
Zellige tiles are naturally sealed and protected, making them durable for kitchen use. Sweep regularly to remove dirt and abrasive particles that can dull the glaze. Clean with a mild soap and water solution, avoid acidic or abrasive cleaners that damage the surface. Grout joints require separate attention and should be sealed per manufacturer recommendations to prevent staining and moisture absorption. In humid or coastal environments, ensure proper ventilation to minimize moisture buildup. The handcrafted glaze is resilient, but keeping your tile free of debris preserves its visual vibrancy and extends its beauty for years.