

Table of Contents
- What Makes Moroccan Tile Installation Different
- Preparing Your Substrate and Surface
- Selecting the Best Thin-Set Mortar for Handmade Tiles
- Handling Batch Variation and Color Blending
- Soaking and Preparing Zellige and Terracotta Before Installation
- Cutting Zellige Tiles Without Chipping
- Laying Out and Leveling Your Moroccan Tile
- How to Grout Zellige Tiles Properly
- Sealing and Protecting Your Handcrafted Tiles
- Troubleshooting Common Installation Errors
What Makes Moroccan Tile Installation Different
Moroccan tile installation differs fundamentally from standard ceramic tile work because of the handcrafted nature of zellige, terracotta, and bejmat tiles. These aren't factory-precision products with uniform thickness, color, or porosity. Each tile carries the mark of its maker, which means installation demands flexibility, patience, and an understanding of how authentic handmade moroccan tile materials behave differently than their industrial counterparts.
At Justmorocco, the most common mistake is treating handcrafted tiles like mass-produced alternatives. Traditional installation methods assume uniform substrate contact and consistent grout joints. Handmade tiles don't cooperate with that assumption. The imperfections that give these tiles their aesthetic value also require a more thoughtful approach to adhesive selection, leveling, and grouting.
The core challenge isn't complexity, it's adaptation. Handcrafted moroccan tiles have natural batch variation in color, thickness, and water absorption. A trowel technique that works for porcelain won't work here. The substrate preparation, adhesive choice, and grouting method all need adjustment. Understanding these differences upfront prevents costly mistakes and ensures your installation showcases the tiles' authentic character rather than fighting against it.
Preparing Your Substrate and Surface
The substrate is your foundation, and with handmade tiles, it matters more than most installers realize. Moroccan tiles, especially zellige and terracotta, are more forgiving of minor substrate imperfections than rigid porcelain, but only if you start with a clean, stable base.
Begin with a thorough substrate inspection. Walk the floor or wall and look for movement, cracks, or soft spots. If you're installing over existing tile, remove it completely rather than tiling over it. Moroccan tiles need direct contact with a solid substrate, not a layered system that can shift independently. For walls, use cement board rated for wet areas. For floors, a properly cured concrete slab or cement backerboard works best.
Once the substrate is confirmed solid, clean it aggressively. Use a degreaser like trisodium phosphate to remove dust, oils, and residue. Handmade tiles have variable porosity, and surface contamination interferes with adhesive bonding. Rinse thoroughly and allow complete drying. A damp substrate will cause the thinset to set unevenly and can lead to tiles lifting months later.
For porous substrates like raw concrete, apply a primer or bonding agent. This seals minor voids and creates a consistent surface for thinset adhesion. Skip this step and you'll have adhesive soaking into the substrate unevenly, leaving insufficient mortar contact under the tiles themselves.
Level the substrate as much as practical. Moroccan tiles are more forgiving of minor slopes than rigid tiles, but you still want no more than a 1/4-inch variance over 10 feet. Use a long straightedge to identify high and low spots. Grind down high spots and fill low areas with leveling compound.
Selecting the Best Thin-Set Mortar for Handmade Tiles
The adhesive you choose makes or breaks your installation. Standard thin-set mortar works, but not all formulations are equal for handcrafted moroccan tiles. The key variable is porosity and water absorption.
Handmade zellige and terracotta tiles absorb water at different rates than glazed ceramic. Some handcrafted tiles pull moisture from the thinset rapidly, causing it to set too fast and creating weak bond lines. Others absorb slowly, allowing the mortar to remain workable longer but potentially trapping air pockets.
Use a modified thin-set mortar specifically designed for porous or handmade tiles. Modified thin-sets contain latex or acrylic polymers that improve flexibility and bond strength on variable surfaces. For zellige and terracotta, a polymer-modified thin-set rated for both wet and dry conditions provides the best insurance. Avoid non-modified (unmodified) thin-sets for moroccan tiles, they're too brittle for the slight movement that occurs with handcrafted materials.
The best thin-set mortar for handmade tiles is one that matches your tile's porosity. If you're unsure, ask your supplier. When in doubt, choose a thin-set rated for high-porosity tiles and porous substrates.
Mixing consistency matters. Thin-set should be the consistency of peanut butter, thick enough to hold ridges from the trowel but spreadable without excessive effort. Too thin and it won't support the tile. Too thick and you'll have voids under the tile where the trowel ridges don't collapse and make full contact.
Apply thin-set using a notched trowel held at a 45-degree angle. The size of the notch depends on tile size: 1/4-inch for small tiles (under 8 inches), 3/8-inch for medium tiles (8-12 inches), and 1/2-inch for larger handcrafted pieces. The goal is consistent ridges that will collapse when the tile is pressed into place, creating full adhesive coverage underneath.
Handling Batch Variation and Color Blending
Batch variation is the signature of authentic handmade moroccan tiles, and it's also the most common source of installation anxiety. Each batch of zellige or terracotta tiles carries slight differences in color, glaze depth, and thickness. This isn't a defect, it's proof of handcraftsmanship.
The installer's job is to blend these variations intentionally rather than let them cluster. Open all your tile cartons before you start. Lay out tiles from different boxes on the floor and study the range of colors and tones you're working with. This visual inventory prevents you from accidentally creating blocks of identical tiles that look monotonous or artificial.
During layout, rotate tiles and pull from multiple cartons in sequence. If you're laying a 10-by-10-foot floor, don't grab 10 tiles from box 1, then 10 from box 2. Instead, alternate: one from box 1, one from box 2, one from box 3, cycling through your cartons. This distributes color variation evenly and creates a cohesive, intentional appearance.
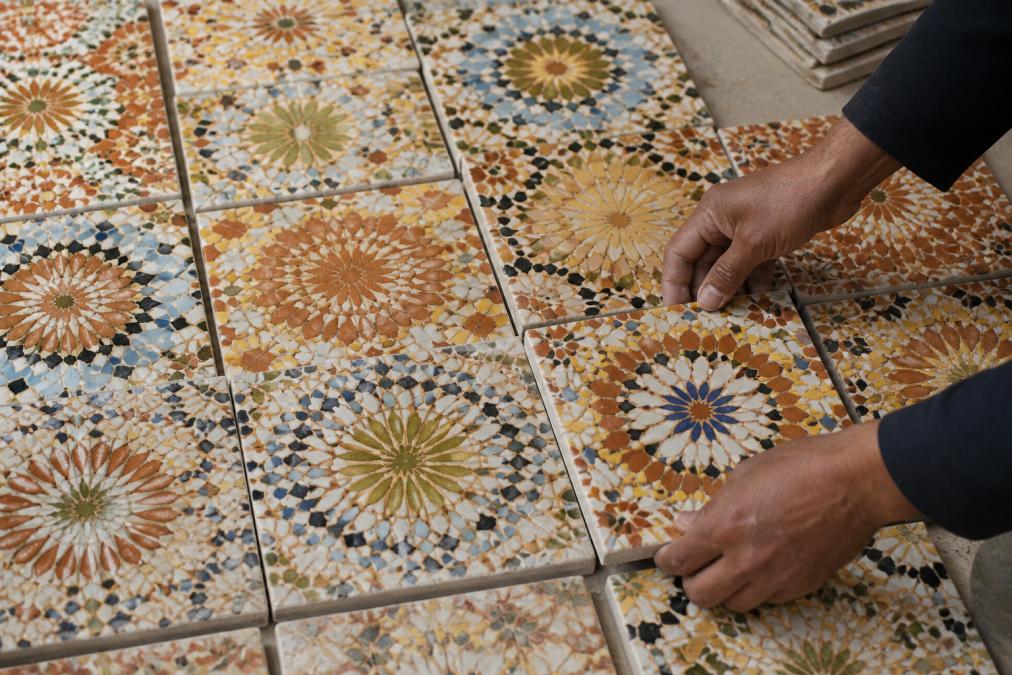
Some installers and designers use batch variation as a design feature. Instead of blending uniformly, they create intentional color gradients or patterns. A darker tile in one corner gradually transitions to lighter tones. This approach works beautifully with moroccan tiles and turns a potential liability into a design asset.
Thickness variation is subtler but equally important. Handmade tiles may vary by 1/8 inch from thinnest to thickest. Use leveling spacers or shims under tiles as needed to keep the surface plane consistent. A lippage (uneven surface) of more than 1/16 inch becomes visible and catches light awkwardly. Spend the extra time shimming now rather than living with an uneven floor for years.
Soaking and Preparing Zellige and Terracotta Before Installation
Zellige and terracotta tiles are porous and will pull moisture from your thin-set if you don't prepare them properly. Dry, porous tiles act like sponges, absorbing water from the mortar and preventing proper hydration of the adhesive. This leads to weak bonds and tiles that can shift or fail.
The solution is pre-soaking. Submerge your tiles in clean water for 15-30 minutes before installation. This saturates the tile's pores so they won't compete with the thin-set for moisture during curing. After soaking, remove tiles from water and allow surface moisture to evaporate, they should be damp, not dripping wet.
For large-scale installations, soaking in batches makes sense. Fill a tub or basin with clean water, submerge 20-30 tiles, wait 20 minutes, remove them, and let them air-dry while you install the previous batch. By the time you need the next batch, surface moisture will have evaporated and they'll be ready to set.
Some installers skip soaking, assuming modern thin-sets handle porosity automatically. This is a gamble. Unsoaked zellige and terracotta tiles will pull moisture from the adhesive faster than it can set properly, leaving weak spots that show up months later as loose tiles or hollow-sounding areas when tapped.
The soaking step is especially critical for terracotta tiles, which are more porous than glazed zellige. Unglazed terracotta can absorb water so aggressively that thin-set won't bond properly without pre-saturation.
Cutting Zellige Tiles Without Chipping
Cutting handmade moroccan tiles requires different technique than cutting uniform ceramics. Zellige and handcrafted tiles have inconsistent internal structure, some areas are denser, others more porous. A standard wet saw blade that works perfectly on porcelain can catch and chip handmade tiles.
Use a diamond blade specifically rated for cutting handmade or artisanal tile. Wet saws work best for zellige, the water cools the blade and reduces chipping. Set the blade speed to medium or slightly lower than you'd use for standard ceramic. Rushing the cut increases the risk of chipping.
Mark your cut line clearly on the tile using a pencil or marker. Position the tile so the blade enters the surface smoothly and steadily. Don't force the tile into the blade, let the blade do the work. A gentle, consistent feed pressure produces cleaner cuts than aggressive pushing.
For small cuts or notches, an angle grinder with a diamond blade works, but it generates dust and requires respiratory protection. A wet saw is safer and produces better results for moroccan tiles. If you're making many cuts, the investment in a quality wet saw rental pays for itself in time saved and quality improved.
Some handcrafted tiles are too delicate or irregular to cut safely. In these cases, use the tile whole and adjust your layout. Moroccan tile installations often benefit from working with the tiles' natural shapes rather than forcing them into uniform patterns.
Laying Out and Leveling Your Moroccan Tile
Layout is where your preparation pays off. The goal is a visually cohesive surface where color variation is distributed intentionally and the plane is consistent across the entire installation.
Start with a dry layout. Arrange tiles on the substrate without adhesive to establish the pattern. This is where you'll identify which tiles need cutting, where color transitions should occur, and how to handle edges and corners. Adjust the layout until it looks intentional and balanced. This step takes time but prevents mid-installation corrections that waste materials and create frustration.
Once the dry layout is finalized, mark reference lines. Use chalk or a laser level to establish perpendicular guides. These lines keep your rows straight as you apply adhesive and set tiles. With handmade tiles' natural variation, straight lines become even more important as a visual anchor.
Apply thin-set in manageable sections, typically 3-4 square feet at a time. Use a notched trowel at a 45-degree angle to create consistent ridges. Press each tile firmly into the adhesive, using a slight twisting motion to ensure the ridges collapse and create full contact. Check the tile's position with a level before moving to the next one.
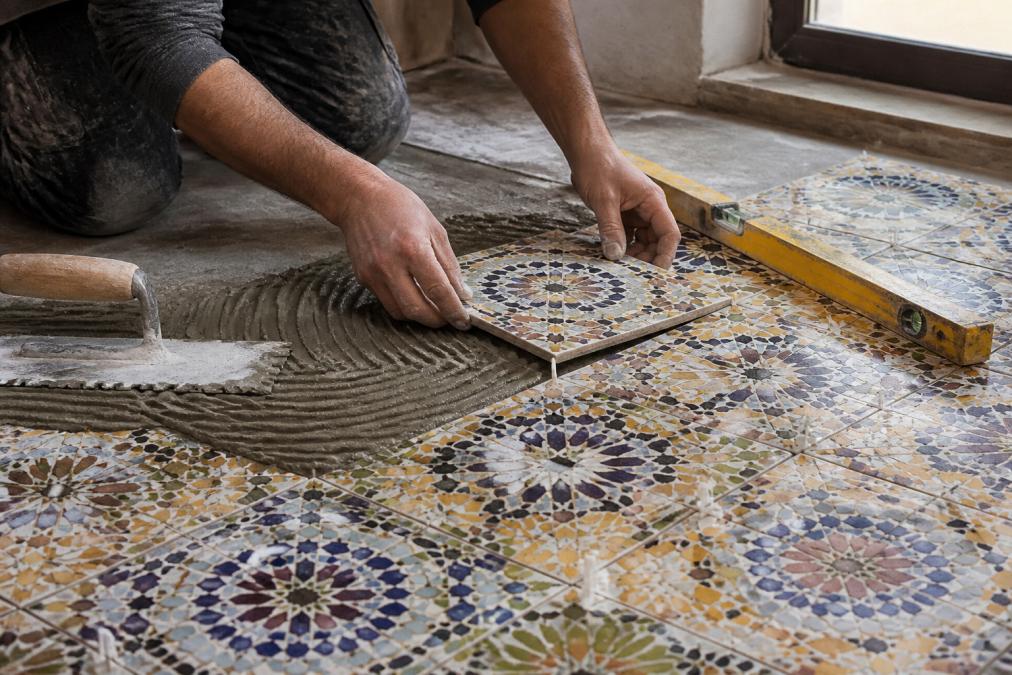
Leveling is critical. Use spacers to maintain consistent joint width, typically 1/4 inch for moroccan tiles, though thicker grout joints (3/8 inch) can enhance the handcrafted aesthetic. Place spacers at each corner of the tile. As you set each new tile, check it with a level in both directions. Shim underneath if needed to keep the surface plane consistent.
The lippage tolerance for handmade tiles is tighter than for rustic looks but more forgiving than for polished finishes. Aim for no more than 1/16 inch variation in height across adjacent tiles. This keeps the surface visually flat while respecting the tiles' natural character.
How to Grout Zellige Tiles Properly
Grouting moroccan tiles is where many installations either succeed or fail. The grout stabilizes the tiles, fills gaps, and protects the substrate from water infiltration. With handmade tiles, proper grouting technique is essential.
Choose a grout formulation appropriate for handmade tiles. Unsanded grout works best for narrow joints (under 1/8 inch) and prevents scratching glazed surfaces. Sanded grout is better for wider joints (1/4 inch and above) because it resists cracking as it cures. For moroccan tiles with variable joint widths, a flexible or modified grout rated for porous tiles provides extra insurance against cracking.
Allow the thin-set to cure fully before grouting, typically 24-48 hours depending on humidity and product specifications. Premature grouting can disturb the tiles and weaken the adhesive bond.
Mix grout to a peanut butter consistency, thick enough to hold shape but spreadable without excessive force. Mix only what you can use in 30 minutes; grout begins setting and becomes difficult to work with as it cures.
Apply grout using a grout float held at a 45-degree angle. Push grout diagonally across the tiles to force it into the joints. Work in small sections to keep the grout from drying before you can tool the joints. Once the grout has firmed slightly (typically 15-30 minutes), use a damp sponge to wipe the tile surface and tool the grout joints to a consistent depth and finish.
The key to proper grouting is removing excess grout from the tile surface while it's still workable. Grout haze, a thin film of dried grout on the tile surface, is difficult to remove once it hardens. Wipe frequently with a damp sponge, rinsing the sponge often. This also compacts the grout and improves its strength.
For zellige and handcrafted tiles with variable porosity, grout can be absorbed unevenly, causing color inconsistency. A grout sealer applied after curing helps prevent this and protects the grout from staining.
Sealing and Protecting Your Handcrafted Tiles
Sealing moroccan tiles protects both the tile surface and the grout from moisture, staining, and wear. Handmade tiles, especially unglazed terracotta and zellige, benefit significantly from proper sealing.
Penetrating sealer is the best choice for handcrafted moroccan tiles. It soaks into the tile's porous surface without creating a glossy topcoat, preserving the tile's natural appearance and texture. Penetrating sealers are water-based or solvent-based; water-based options are easier to apply and less toxic, while solvent-based sealers often provide longer-lasting protection.
Wait at least 72 hours after grouting before sealing to allow the grout to cure fully. Apply sealer according to the product's instructions, typically one or two coats with drying time between applications. Use a brush or roller to apply evenly, avoiding puddles or heavy buildup.
Grout should also be sealed to prevent staining and moisture infiltration. Grout sealer is applied separately from tile sealer and typically cures for 48-72 hours before the floor or wall can be used.
For glazed zellige tiles, sealing is less critical but still beneficial for grout protection. Unglazed terracotta and handcrafted tiles with visible porosity must be sealed to prevent water absorption and staining.
Troubleshooting Common Installation Errors
Even with careful planning, moroccan tile installations sometimes develop problems. Understanding common issues and their causes helps you fix problems early or prevent them entirely.
Loose or hollow-sounding tiles indicate poor adhesive contact. This typically results from unsoaked porous tiles, thin-set applied too thinly, or substrate contamination. If you catch this during installation, remove the affected tiles, clean the substrate and tile back, and reset with fresh thin-set. If discovered after curing, the tiles may need full removal and reinstallation.
Cracked grout in the first weeks usually means the grout cured too quickly or too slowly. Rapid curing (excessive heat or low humidity) creates stress cracks. Slow curing in cold, damp conditions can cause weakness. Control the curing environment and avoid foot traffic for at least 48 hours after grouting.
Lippage or uneven surfaces become visible once grouting is complete. If the variance is minor (1/16 inch or less), it's often acceptable and adds to the handcrafted aesthetic. Larger variances can be addressed by grinding high spots carefully or, if severe, removing and resetting affected tiles.
Grout haze on the tile surface is frustrating but manageable. If it occurred during initial grouting, additional sponging with clean water usually removes it. If it hardened, a grout haze remover or mild acid wash (diluted white vinegar) can help, though test on inconspicuous areas first to avoid damaging the tile.
Color inconsistency in grout often results from uneven moisture absorption during curing. Ensure consistent humidity during the 48-72 hour cure period. Sealing the grout after curing helps prevent future staining and color drift.
Water infiltration behind tiles indicates failed adhesive bonds or substrate issues. Prevention is far easier than repair. Ensure proper substrate preparation, adequate thin-set coverage, and complete grouting. For areas prone to water exposure (shower walls, bathroom floors), consider a waterproofing membrane under the tile for extra protection.
Installing moroccan tile properly rewards patience and attention to detail. The handcrafted nature of zellige, terracotta, and bejmat tiles demands an approach that respects their unique characteristics rather than forcing them into industrial tile standards. From substrate preparation through sealing, each step builds on the previous one. When done correctly, your moroccan tile installation will showcase authentic craftsmanship and durability for decades.
Justmorocco's moroccan tile collection includes pieces specifically selected for their quality and authenticity. For example, our exquisite Moroccan tile is available for $175.00 per pack, and our Marrakech riad tile is $165.00 per pack. Our team understands the installation challenges these materials present and can guide you through the process, from material selection through final sealing. Whether you're installing a kitchen backsplash, bathroom floor, or accent wall, we also offer custom tile project that complement your moroccan tile work, allowing you to create a fully coordinated aesthetic throughout your space. Starting with authentic handcrafted tiles and following proper installation technique ensures results that reflect the beauty and character of true moroccan craftsmanship. Explore our moroccan tile options and begin your installation project with confidence.
Frequently Asked Questions
Do Moroccan zellige tiles require a special adhesive?
Yes. Handmade zellige tiles are more porous and uneven than standard ceramic, so they require a flexible, polymer-modified thin-set mortar designed for handcrafted tiles. Standard thin-set may not provide adequate coverage in the dips and variations of zellige surfaces. Always check the adhesive manufacturer's recommendations for handmade or artisanal tile installations before committing to a product.
Can I install Moroccan tiles myself, or do I need a professional?
DIY installation is possible if you have basic tile experience and patience for the handmade variations. Moroccan tile installation demands careful substrate preparation, proper leveling to handle thickness differences, and knowledge of grouting without scratching delicate surfaces. For large kitchen or bathroom projects, professional installation ensures warranty coverage and reduces costly mistakes. Start with a smaller backsplash or accent wall to build confidence before tackling larger areas.
What is the difference between installing zellige and standard ceramic tiles?
Zellige tiles are hand-cut, irregular in thickness and size, and highly porous, requiring different handling than uniform ceramic tiles. Standard ceramic tiles sit flat and use uniform spacing; zellige demands flexible adhesive, wider grout joints (typically 1/2 inch or more), and careful leveling to accommodate natural variations. Zellige also requires soaking before installation to prevent it from pulling moisture from the mortar, and often needs sealing after grouting to protect the porous surface.
How do I handle the natural variations in Moroccan tile thickness?
Pull tiles from multiple cartons during layout to distribute color and thickness variation evenly across your surface. Use a flexible thin-set and install with a notched trowel held at 45 degrees to ensure full coverage behind each tile. Adjust mortar depth as you work to accommodate thicker tiles. A leveling system or spacers designed for handmade tiles helps maintain a consistent surface plane despite underlying thickness differences. Take time during installation, rushing leads to visible high spots and poor adhesive contact.